A roof may seem like an insignificant part of a home, but it protects the entire structure from rain, snow, sunlight, and extreme temperatures. Homeowners need to understand the different parts of a roof and how they function.
Before beginning work, a good roofer will remove outdoor furniture, cover valuable foundation plants, and keep pets indoors (the vibrations of hammering can knock pictures off walls). They will also dispose of the old roofing material and clean up stray nails. Visit Website to learn more.
Asphalt shingles are among the most popular roof materials. They’re easy to install, and they come in a wide range of colors and styles that can match any aesthetic or architectural design. They’re also fairly durable and can be recycled. They’re available with fire resistance treatment, impact-resistant coatings and solar reflective coatings that can lower cooling costs during the summer.
Many types of roofing shingle are available, including strip shingles, architectural shingles and laminated shingles. Each has its own advantages and disadvantages. The most basic type of asphalt shingle is the three-tab shingle. This is a single layer with cut-outs that give it a repetitive pattern and is the least expensive option.
The next step in shingle installation is to put a layer of felt underlayment on the roof deck. This provides a secondary waterproofing layer to the roofing material. It’s important to make sure the underlayment is properly secured, or it can cause leaks. It should be nailed to the deck with nails that are hot-dip galvanized or stainless steel (as required by the International Building Code for homes within 3,000 feet of salt water).
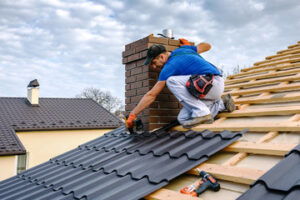
Once the underlayment is in place, you’re ready to start putting on shingles. For the first course of shingles, measure and mark where you’ll place the shingle on each side of the roof. Then, snap a chalkline between those marks. Start with the bottom row of shingles and work up, nailing them as you go. Be sure the shingles overlap each other by about 1/2 inch and nail in several places around the shingle’s edge.
When you reach the ridge of the roof, you can either use special ridge shingles or bend a number of regular shingles into 3-tabbed shingles with no tabs and nail them to the ridge. When nailing, put a nail in each shingle about 1 inch above the cuts that define the tabs.
Roofers also install metal flashing around chimneys, vents and stacks to prevent water from seeping in those areas. These should be interlaced with the shingles so that the bottom 2 or 3 rows that meet the flashing go under it, and the upper shingles go over it.
Metal Roofs
Metal roofs are durable and a great choice for climates that are prone to heavy rain or hail. They also help to save energy and the material is recyclable. While they are more expensive than shingles, they can last up to 50 years or more and increase the resale value of a home.
When installing a metal roof, it is important to hire a licensed professional. Failing to install the roof correctly can lead to storm damage, leaks and other costly problems. A good metal roofing contractor will use a variety of tools and techniques to ensure that the installation is done properly. They will also ensure that all necessary building codes are followed.
During the installation process, it is important to prepare the sheathing and roof decking for the metal panels. This includes cleaning off the existing roof and removing any rotten or damaged areas of the sheathing or decking. It is also a good time to replace any wood trim that is necessary.
After the preparation of the roof is complete, it is time to start laying the metal panels. It is a good idea to start at the eaves and work upwards. This helps to keep water from seeping in between the panels as they are being installed. It is also a good idea to install any flashing or sealants that are needed around the roof penetrations such as chimneys, vents and skylights.
Once the panels are installed, it is a good idea to put in the ridge cap. This can be done by centering it evenly on each side of the roof and then running a strip of sealant tape along the edge. It is also a good idea to add a closure strip to the ridge, either a vented or solid strip depending on the design of your roof.
When it comes to metal roofs, proper maintenance is essential to ensuring that they will last for the long term. The metal can rust quickly in damp or wet climates, so it is important to inspect the roof frequently and touch up any rust spots as soon as they appear. It is also a good idea to clear any debris from the roof regularly to prevent it from becoming trapped and causing water infiltration.
Solar Panels
Solar panels, also known as photovoltaic (PV) modules, capture the sun’s energy and convert it to electricity to power your home. They’re made of glass, wires and silicon and mounted on your roof or in a sunny spot in your yard to create clean, renewable energy and reduce dependence on fossil fuels. Solar power systems can be used to run lighting, appliances and even the entire home or a portion of your home’s electrical system.
There are several things to consider before installing solar panels. First, make sure your home is compatible by having a professional conduct an assessment. Then, determine how much energy you need from your solar panel system. This will help you purchase the correct size of solar panels. Once the system is installed, you’ll be able to see how your system performs over time.
The type of solar panel you choose depends on your budget and available roof space. You can opt for high-efficiency monocrystalline or polycrystalline solar panels. If you’re looking to save money upfront, opt for lower-cost polycrystalline panels. If you’re interested in the long-term benefits of reducing your electric bill, go with high-efficiency monocrystalline panels.
Once the installation process is complete, you’ll be able to turn on your solar panel system and watch your utility bills decline! The solar system requires very little maintenance and only needs to be kept clear of obstructions. It’s important to note that solar panels work best on cloudless days and with ample sunlight exposure.
Before your solar panels can be connected to the electric grid, a representative from your local utility company must inspect the install. They’ll ensure that all electrical wiring is done properly and that the mounts are securely attached. They’ll also verify that the system meets electrical and roof setback requirements. Once this is completed, your installer will switch you over to a completely free, clean and sustainable source of energy!
Roof Windows
A roof window is an excellent way to bring natural light into the home. It can also improve the look of the room and increase its overall comfort. However, it is important to understand the process before beginning work on a roof window installation. There are many myths and misconceptions that may prevent homeowners from adding one to their property. The following tips will help avoid common mistakes when installing a roof window.
First, it is essential to make sure that the opening for the window is large enough to fit the frame and its sash. The area should be measured from the edge of the rafters to the centre of the opening to ensure that the window will fit correctly. Then, mark the rafters to indicate where the cuts should be made. This will help to make the job much easier and less rushed.
Next, a course of tiles needs to be removed above the window. Then, the lower installation batten can be fixed to the joists with wood screws. It is important to use the correct screws and ensure that they are not over tightened as this can damage the timber. At this stage, the part 5 flashing sections can be fitted.
The VELUX underfelt collar can now be positioned around the window. The end that is longer should go at the top of the window, with the shorter end being dressed around any counter battens if there are any. Then, the brackets are fitted to the frame using the instructions that come with it.
Ideally, the window should be fitted between two sets of rafters. This will help to reduce the risk of leaks and to keep the insulation as effective as possible. Also, it is important to note that the windows should not be set too low as this can compromise the structure of the roof. The ideal position will be just above a tile line. This will also help to minimise the amount of cutting that needs to be done. Once the window is in place, it can be screwed to the joists.